通过 WireGuard 远程访问家里部署的大模型
通过 WireGuard 远程访问家里部署的大模型
最近 DeepSeek 开源了 R1 模型,并且蒸馏了多个能力不错的小模型,这些小模型给本地部署带来了便利。我在家里的台式机上用 ollama 部署了模型,但是我外出的时候,我想要访问家里的模型,没有公网 IP,就没办法直接访问。网上找了一圈,比如 zerotier, tailscale 这些打洞的方案也很好,但是会和我现在用的「网络软件」有所冲突,甚至在 iOS 上没办法同时开启。 发现 WireGuard 是一个不错的方案, 因为我现在用的 [网络软件] 刚好支持 WireGuard , 所以就尝试了一下,发现效果还不错。
网络结构
整个网络结构如下: 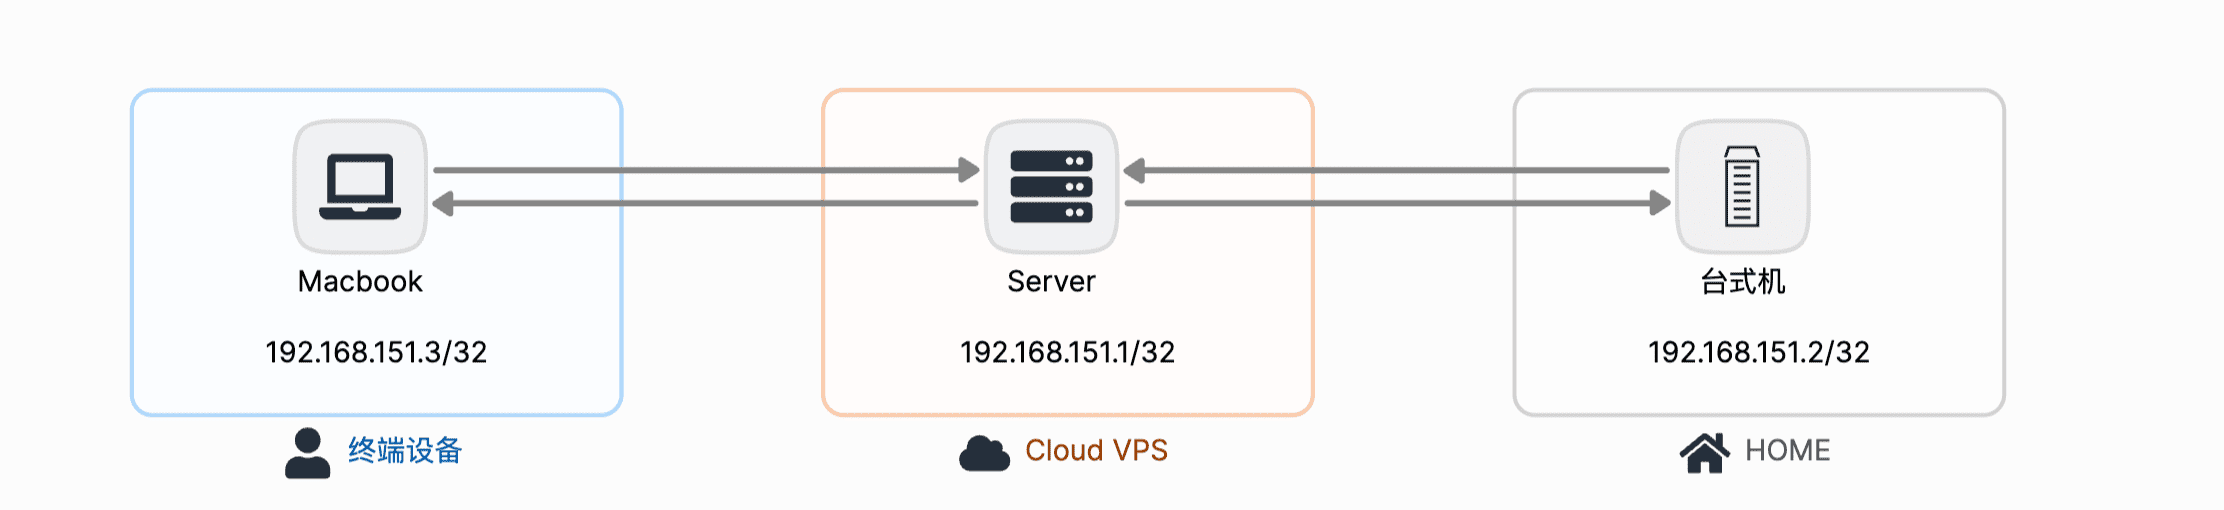
我这里只是对家里的机器进行访问,所以没有用 SNET 转换网段。
Cloud 中继服务端安装 WireGuard
安装 WireGuard
1
sudo apt install wireguard
生成密钥对
执行以下命令后,将在 /etc/wireguard 目录下生成两个文件,分别是:私钥 privatekey 和公钥 publickey :
1
wg genkey | sudo tee /etc/wireguard/privatekey | wg pubkey | sudo tee /etc/wireguard/publickey
创建配置文件
在 /etc/wireguard 目录下创建一个名为 wg0.conf 的配置文件,使用编辑器打开并编写配置:
1
sudo vim /etc/wireguard/wg0.conf
配置文件如下:
1
2
3
4
5
6
7
8
9
10
11
12
13
14
15
16
17
18
19
20
21
22
23
24
25
26
27
28
29
30
31
32
[Interface]
# 中继服务端 WireGuard 地址
Address = 192.168.151.1/32
# WireGuard 监听端口
ListenPort = 24356
# 中继服务端私钥
PrivateKey = priv_key_1

# 配置 iptables 以保证内网数据包不会被防火墙过滤
# 允许 192.168.150.0/24 和 192.168.151.0/24 内网互通
PostUp = iptables -I FORWARD -s 192.168.151.0/24 -i wg0 -d 192.168.151.0/24 -j ACCEPT
PostUp = iptables -I FORWARD -s 192.168.151.0/24 -i wg0 -d 192.168.150.0/24 -j ACCEPT
PostUp = iptables -I FORWARD -s 192.168.150.0/24 -i wg0 -d 192.168.151.0/24 -j ACCEPT

# 删除内网互通在 wg 被关闭的时候
PostDown = iptables -D FORWARD -s 192.168.151.0/24 -i wg0 -d 192.168.151.0/24 -j ACCEPT
PostDown = iptables -D FORWARD -s 192.168.151.0/24 -i wg0 -d 192.168.150.0/24 -j ACCEPT
PostDown = iptables -D FORWARD -s 192.168.150.0/24 -i wg0 -d 192.168.151.0/24 -j ACCEPT

# 家里的机器
[Peer]
# 家里的机器 的公钥
PublicKey = pub_key_2
# 家里的机器 的 WireGuard 地址
AllowedIPs = 192.168.151.2/32

# 终端机
[Peer]
PublicKey = pub_key_3
AllowedIPs = 192.168.151.3/32

# 如果你还有其他的 Peer/终端,列在下面。
启动,查看,关闭 WireGuard
启动 WireGuard
1
sudo wg-quick up wg0
查看 WireGuard 状态
1
sudo wg
关闭 WireGuard
1
sudo wg-quick down wg0
家里的机器安装 WireGuard
这里直接官网下载后安装,新建空隧道,记录下公钥,填写在 中继服务端的配置文件中。 整个配置如下:
1
2
3
4
5
6
7
8
9
[Interface]
PrivateKey = 家里的机器私钥
Address = 192.168.151.2/32

[Peer]
PublicKey = 中继服务端公钥
AllowedIPs = 192.168.151.0/24
Endpoint = 中继服务端IP:24356
PersistentKeepalive = 25
笔记本/手机 终端机
这个也可以使用官方的 app,也可以使用一些第三方的 app, 这里我用的软件的配置大概是:
1
2
3
4
5
6
7
8
9
10
11
[Proxy]
Home = wireguard, section-name = Home

[Rule]
IP-CIDR,192.168.151.0/24,Home,no-resolve

[WireGuard Home]
private-key = 终端机私钥
self-ip = 192.168.151.3
mtu = 1280
peer = (public-key = 中继服务端公钥, allowed-ips = 192.168.151.0/24, endpoint = 中继服务端IP:24356)
使用
最后当我使用 ChatWise 的时候,我就可以给 ChatWise 设置 Ollama 的地址为 192.168.151.2 ,然后就可以访问家里的模型了。 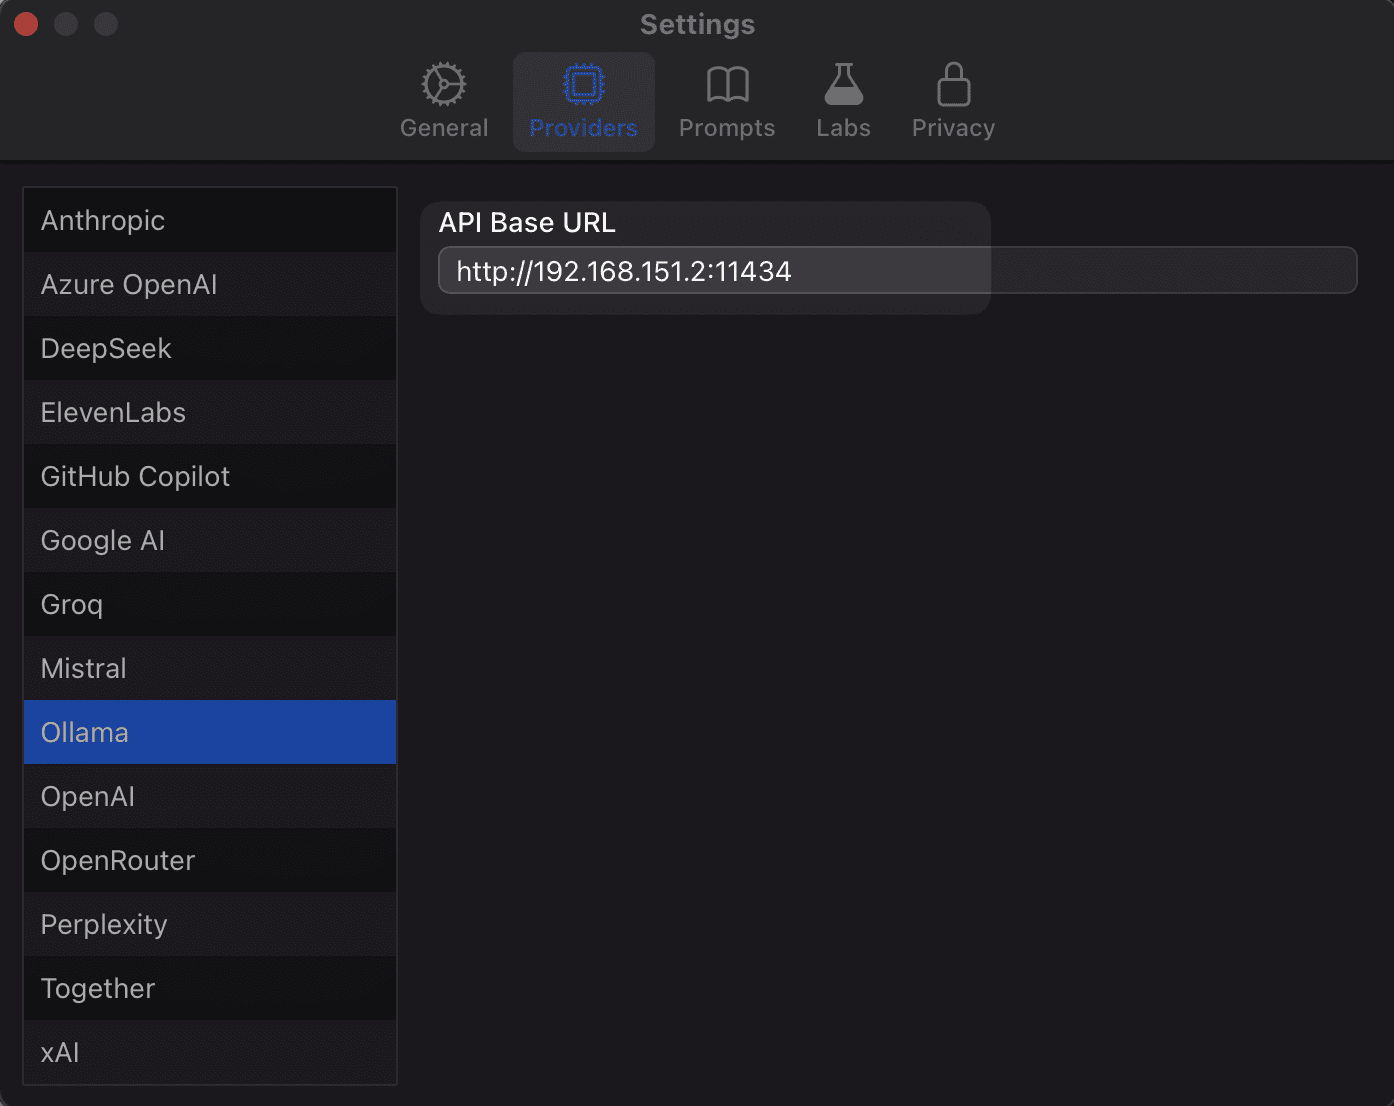
Windows 如果开启了远程桌面,我可以直接通过这种方式使用远程桌面访问家里的机器。
本文由作者按照 CC BY 4.0 进行授权